|
|
| (24 intermediate revisions by the same user not shown) |
| Line 1: |
Line 1: |
| | Although Tibia idle covers every Tibia 8.0 quest, this page is dedicated solely to the custom and unique adventures you’ll find only on Tibia Idle. Here you’ll discover exclusive storylines, hidden challenges and one‑of‑a‑kind rewards crafted just for our server. Enjoy! |
| | |
| {| class="wikitable sortable" | | {| class="wikitable sortable" |
| ! Image !! Name !! Level !! Rewards !! Description | | ! Level !! style="width:160px;" | Rewards !! Name !! Image !! Difficulty |
|
| |
|
| |- | | |- |
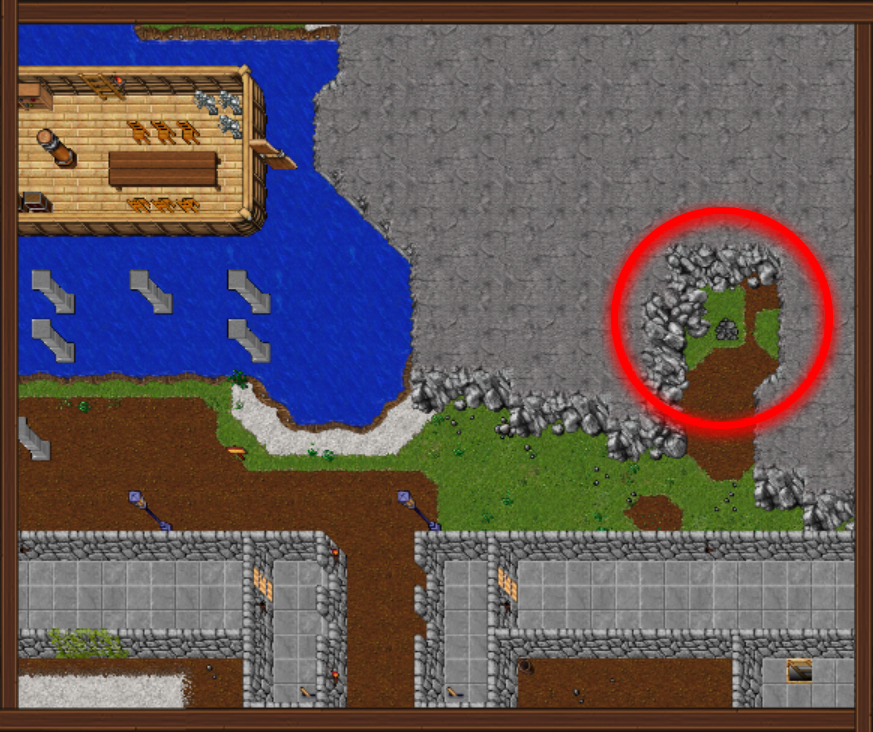
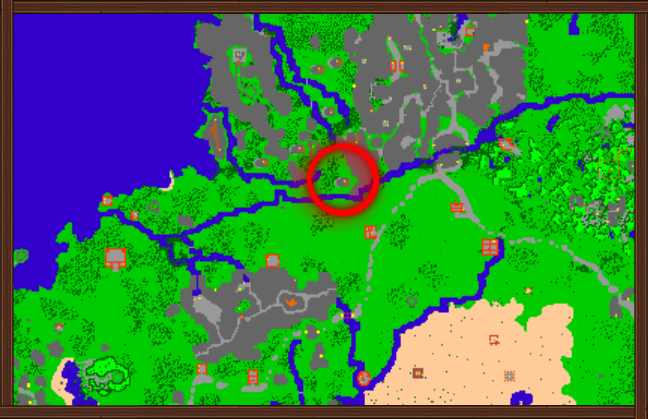
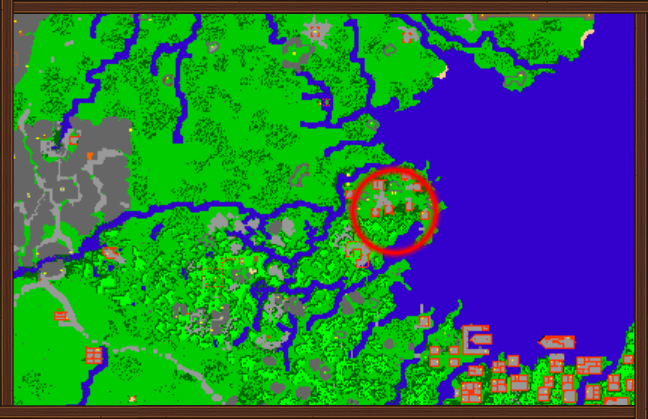
| | <html><a href="Idle_Time_Extension"><img src="https://tibiaidle.com/images/questexpbonus.jpg" width="100" /></a></html> || [[Idle Time Extension]] || 45 || <html><a href="Idle_Time_Extension"><img src="https://tibiaidle.com/item-images/1728.png" width="32" /></a></html> || Near Edron you will find caves and a hole that you have to dig with a shovel. After completing this quest for 30 days, you will have 9 hours of idle exp. You can re-do the quest many times. There is also a quest for the elemental ankh in the underground. Thanks to it, you can check the remaining bonus time. | | | 45 || <html><a href="Idle_Time_Extension"><img src="https://tibiaidle.com/item-images/1728.png" width="32" /></a></html> || [[Idle Time Extension]] || <html><a href="Idle_Time_Extension"><img src="https://tibiaidle.com/images/questexpbonus.jpg" width="100" /></a></html> || ⭐⭐⭐ |
| | |
| |- | | |- |
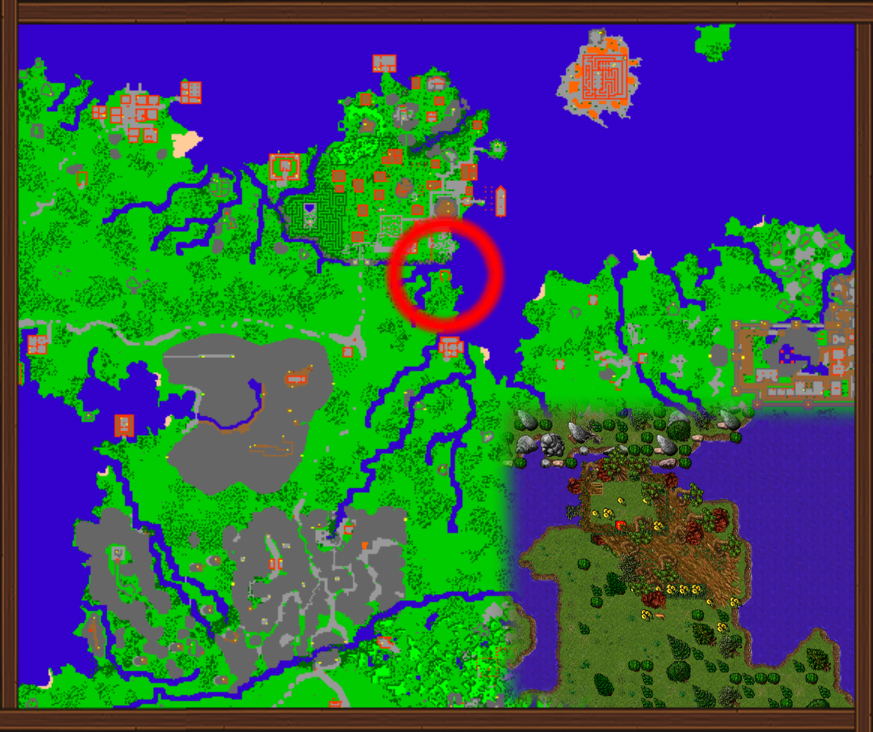
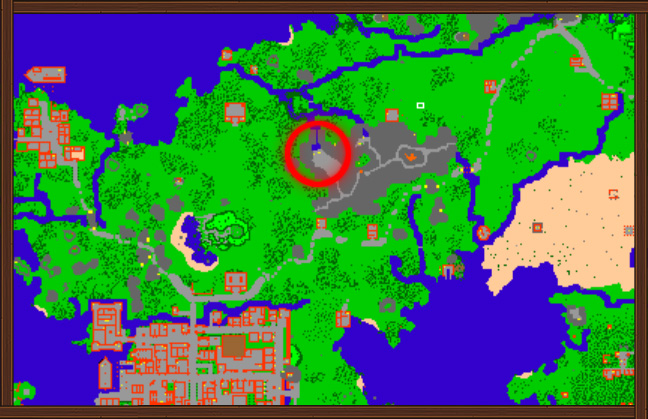
| | <html><a href="Idle_Exp_Bonus_+6%"><img src="https://tibiaidle.com/images/9hquest.jpg" width="100" /></a></html> || [[Idle Exp Bonus +6%]] || 75 || <html><a href="Idle_Exp_Bonus_+6%"><img src="https://tibiaidle.com/images/boost.png" width="32" /></a></html> || After completing this quest, you will have a +6% bonus to idle exp for 30 days. You can complete the quest every 30 days. There is a fee before entry depending on your level. A shovel and PACC are required. | | | 75 || <html><a href="Idle_Exp_Bonus_+6%"><img src="https://tibiaidle.com/images/boost.png" width="32" /></a></html> || [[Idle Exp Bonus +6%]] || <html><a href="Idle_Exp_Bonus_+6%"><img src="https://tibiaidle.com/images/9hquest.jpg" width="100" /></a></html> || ⭐⭐⭐⭐ |
| | |
| |- | | |- |
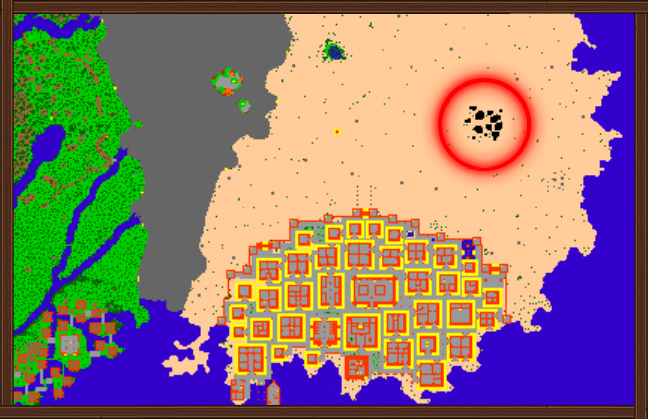
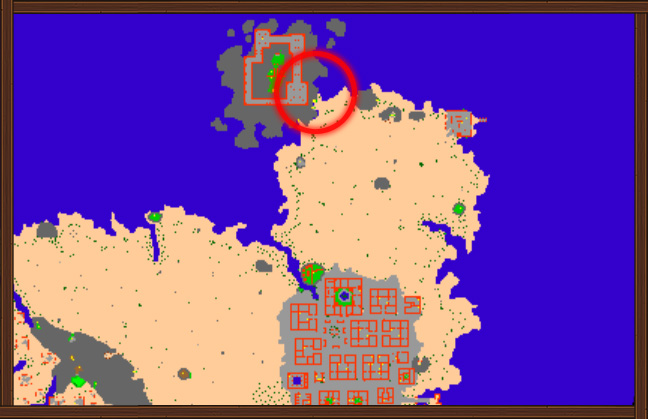
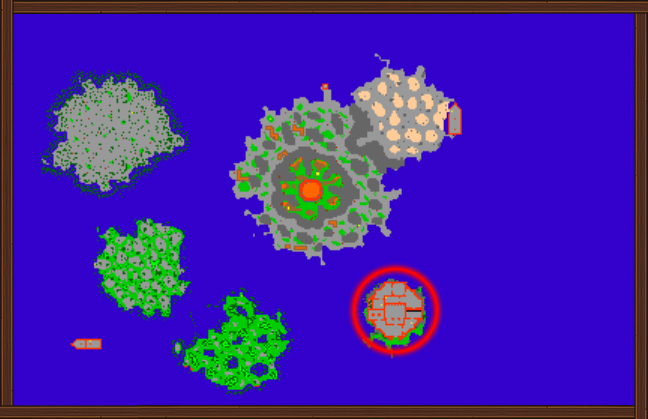
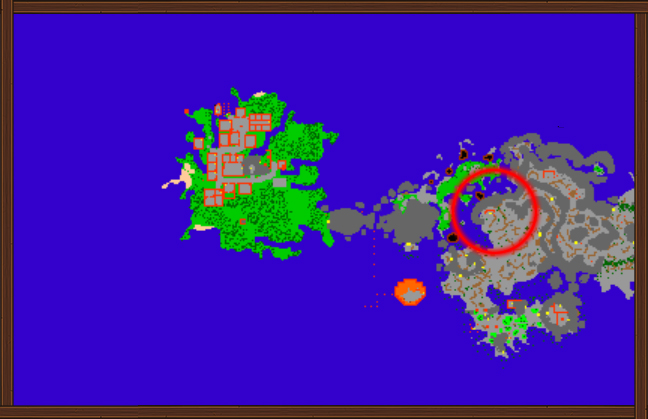
| | <html><a href="Helmet_of_the_Ancients"><img src="https://tibiaidle.com/images/hota.jpg" width="100" /></a></html> || [[Helmet of the Ancients]] || 75 || <html><a href="Helmet_of_the_Ancients"><img src="https://item-images.ots.me/800//2342.gif" width="32" /></a></html> || You start in the tomb marked on the map. You keep going down the stairs until you reach a place where you have to place a scarab coin to get further. After teleporting, taking a few steps north, you will see a level gate at lvl 75. This is where you start the quest. You need to kill three pharaohs whose bodies you will get helmet parts: right horn, left horn, and damaged helmet. With these parts in your backpack, you pull the levers and you will receive a reward. | | | 75 || <html><a href="Helmet_of_the_Ancients"><img src="https://item-images.ots.me/800//2342.gif" width="32" /></a></html> || [[Helmet of the Ancients]] || <html><a href="Helmet_of_the_Ancients"><img src="https://tibiaidle.com/images/hota.jpg" width="100" /></a></html> || ⭐⭐⭐ |
| | |
| |- | | |- |
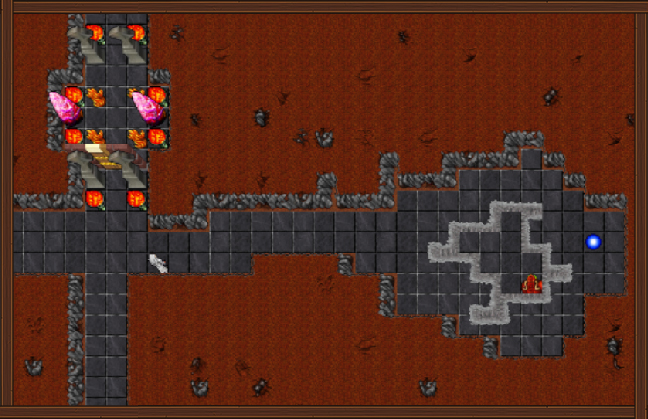
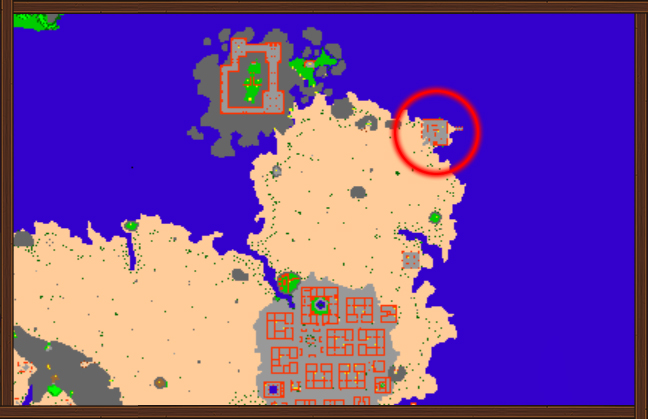
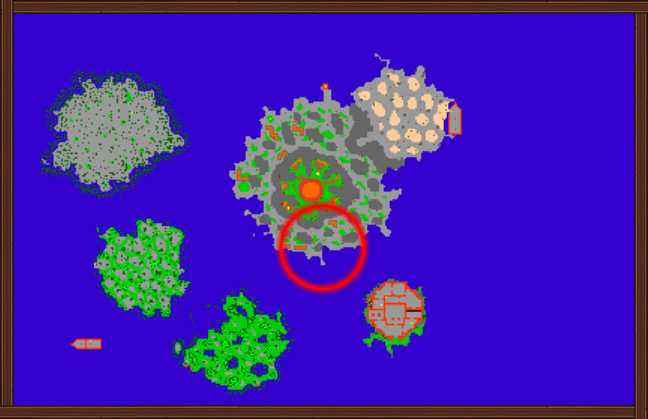
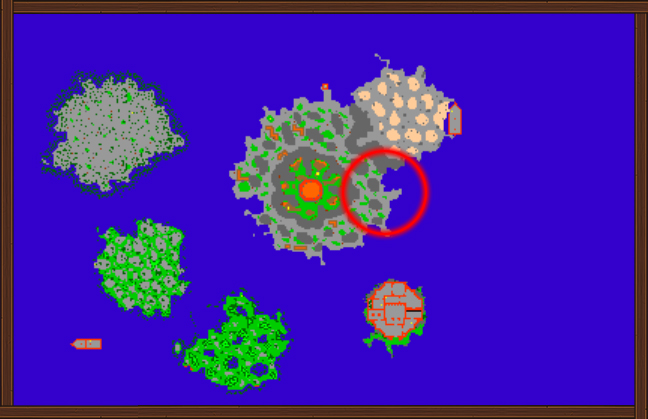
| | <html><a href="Magic_Plate_Armor_Quest"><img src="https://tibiaidle.com/images/MPAQuest.jpg" width="100" /></a></html> || [[Magic Plate Armor Quest]] || 90 || <html><a href="Magic_Plate_Armor_Quest"><img src="https://item-images.ots.me/800//2472.gif" width="32" /></a></html> || You start the quest to the right of the entrance to Demon Helmet. You will encounter enemies that cannot be killed. | | | 90 || <html><a href="Magic_Plate_Armor_Quest"><img src="https://item-images.ots.me/800//2472.gif" width="32" /></a></html> || [[Magic Plate Armor Quest]] || <html><a href="Magic_Plate_Armor_Quest"><img src="https://tibiaidle.com/images/MPAQuest.jpg" width="100" /></a></html> || ⭐⭐⭐⭐ |
| | |
| |- | | |- |
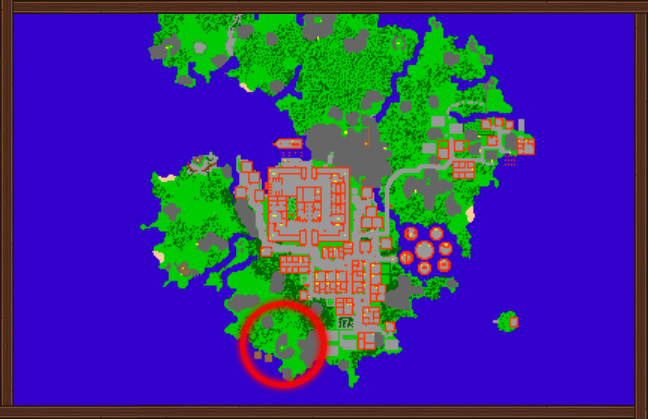
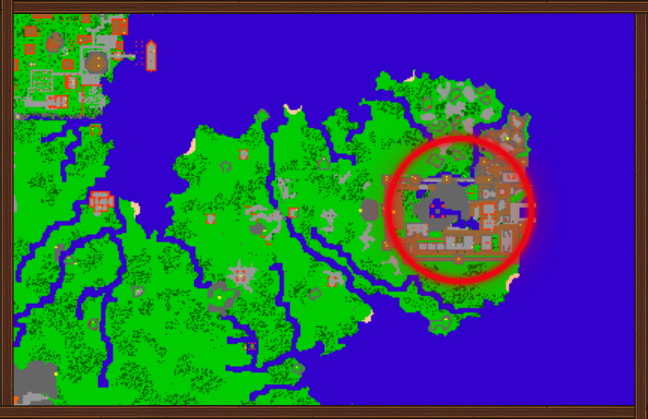
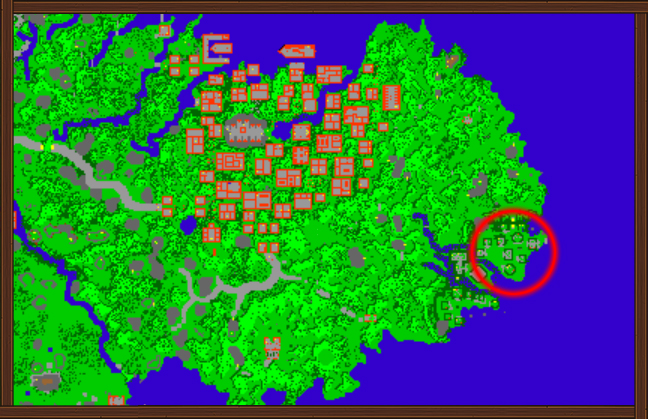
| | <html><a href="Focus_Cape,_Paladin_Armor"><img src="https://tibiaidle.com/images/paladinarmorfocuscape.jpg" width="100" /></a></html> || [[Focus Cape, Paladin Armor]] || 90 || <html><a href="Focus_Cape,_Paladin_Armor"><img src="https://tibiaidle.com/item-images/7615.gif" width="32" /></a> <a href="Focus_Cape,_Paladin_Armor"><img src="https://tibiaidle.com/item-images/7614.gif" width="32" /></a></html> || You start the quest in Liberty Bay, level +1. In the main quest hall you will find several rooms with hidden chests. Many of them are false. You have to find the real one. | | | 90 || <html><a href="Focus_Cape,_Paladin_Armor"><img src="https://tibiaidle.com/item-images/7615.gif" width="32" /></a> <a href="Focus_Cape,_Paladin_Armor"><img src="https://tibiaidle.com/item-images/7614.gif" width="32" /></a></html> || [[Focus Cape, Paladin Armor]] || <html><a href="Focus_Cape,_Paladin_Armor"><img src="https://tibiaidle.com/images/paladinarmorfocuscape.jpg" width="100" /></a></html> || ⭐⭐⭐ |
| | |
| |- | | |- |
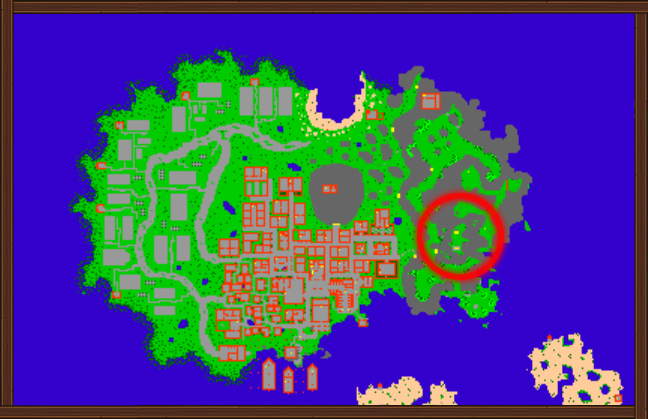
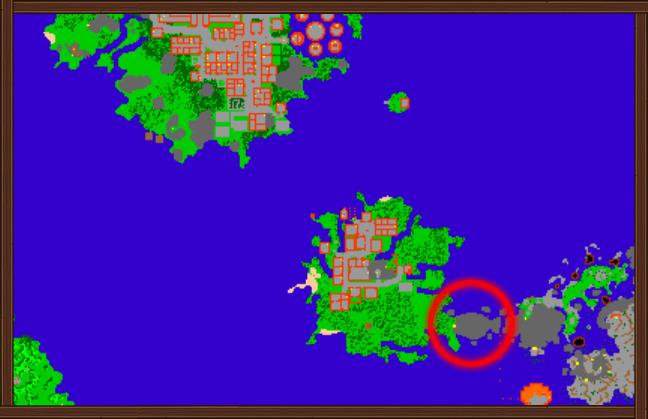
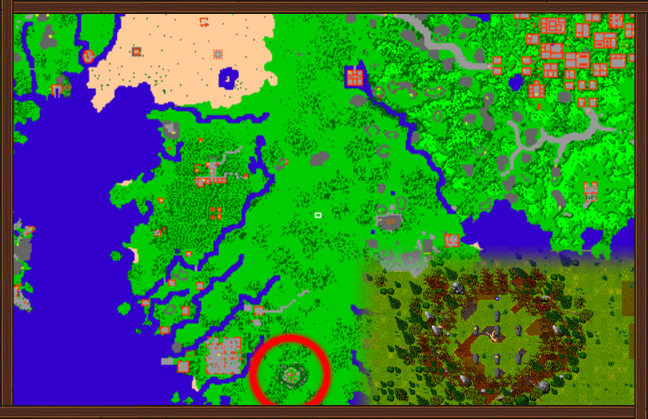
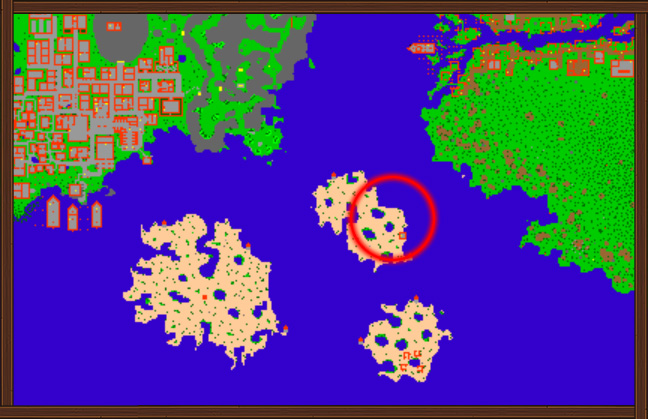
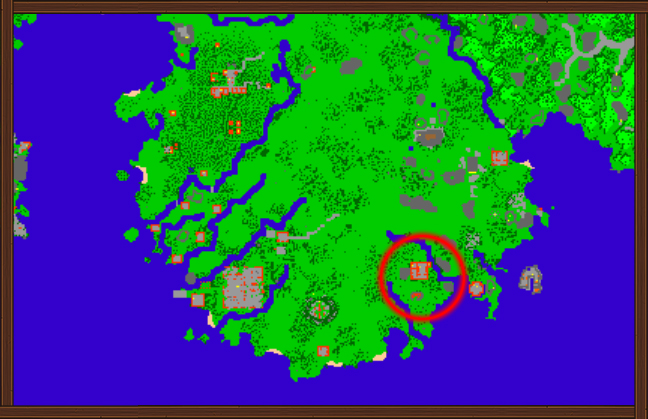
| | <html><a href="Obsidian_Knife,_Blessed_Wooden_Stake"><img src="https://tibiaidle.com/images/obsidianknife.jpg" width="100" /></a></html> || [[Obsidian Knife, Blessed Wooden Stake]] || 90 || <html><a href="Obsidian_Knife,_Blessed_Wooden_Stake"><img src="https://tibiaidle.com/item-images/5908.png" width="32" /></a> <a href="Obsidian_Knife,_Blessed_Wooden_Stake"><img src="https://tibiaidle.com/item-images/5942.gif" width="32" /></a></html> || You start the quest at Goroma in the marked location. All the information will be found once you reach the destination. The Obsidian Knife and Blessed Wooden Stake are used to obtain addon items. | | | 90 || <html><a href="Obsidian_Knife,_Blessed_Wooden_Stake"><img src="https://tibiaidle.com/item-images/5908.png" width="32" /></a> <a href="Obsidian_Knife,_Blessed_Wooden_Stake"><img src="https://tibiaidle.com/item-images/5942.gif" width="32" /></a></html> || [[Obsidian Knife, Blessed Wooden Stake]] || <html><a href="Obsidian_Knife,_Blessed_Wooden_Stake"><img src="https://tibiaidle.com/images/obsidianknife.jpg" width="100" /></a></html> || ⭐⭐ |
| | |
| |- | | |- |
| | <html><a href="Stream_Quest"><img src="https://tibiaidle.com/images/streamQuest.jpg" width="100" /></a></html> || [[Stream Quest]] || 90 || <html><a href="Stream_Quest"><img src="https://tibiaidle.com/item-images/twitchpixel.png" width="32" /></a> <a href="Stream_Quest"><img src="https://tibiaidle.com/item-images/youtubepixel.png" width="32" /></a></html> || Stream Quest is a special, irregular event, typically organized once per month. This grand adventure brings together a large number of players for an unforgettable experience! The event is live-streamed on Twitch or YouTube, allowing the community to share the excitement in real-time. <a href="streamquest.php">Learn more</a> | | | 90 || <html><a href="Stream_Quest"><img src="https://tibiaidle.com/item-images/twitchpixel.png" width="32" /></a> <a href="Stream_Quest"><img src="https://tibiaidle.com/item-images/youtubepixel.png" width="32" /></a></html> || [[Stream Quest]] || <html><a href="Stream_Quest"><img src="https://tibiaidle.com/images/streamQuest.jpg" width="100" /></a></html> || ⭐⭐⭐⭐⭐ |
| | |
| |- | | |- |
| | <html><a href="Paradox_Tower"><img src="https://tibiaidle.com/images/paradoxTower.jpg" width="100" /></a></html> || [[Paradox Tower]] || 105 || <html><a href="Paradox_Tower"><img src="https://tibiaidle.com/item-images/7424.png" width="32" /></a></html> || You start the quest here. You must have 5 demonic essence and machete to get to this place and cut a passage in the maze behind the door. Be careful, each next level of the tower is one more enemy to defeat. You cannot advance to the next level unless you kill all the monsters. The reward is on the last level of the tower. PACC Required. | | | 105 || <html><a href="Paradox_Tower"><img src="https://tibiaidle.com/item-images/7424.png" width="32" /></a></html> || [[Paradox Tower]] || <html><a href="Paradox_Tower"><img src="https://tibiaidle.com/images/paradoxTower.jpg" width="100" /></a></html> || ⭐⭐⭐⭐⭐ |
| | |
| |- | | |- |
| | <html><a href="Retro_Quest"><img src="https://tibiaidle.com/images/retroquest.jpg" width="100" /></a></html> || [[Retro Quest]] || 110 || <html><a href="Retro_Quest"><img src="https://tibiaidle.com/item-images/7562.gif" width="32" /></a> <a href="Retro_Quest"><img src="https://tibiaidle.com/item-images/7583.gif" width="32" /></a> <a href="Retro_Quest"><img src="https://tibiaidle.com/item-images/7584.gif" width="32" /></a> <a href="Retro_Quest"><img src="https://tibiaidle.com/item-images/7585.gif" width="32" /></a></html> || Quest for people who like puzzles. We don't give any instructions on how to do it. We only indicate the starting point. The charm of memories will return. There you will meet monsters and graphics from the oldest versions of Tibia. As a reward, you will always get a multi-tool and one random retro item. PACC required. | | | 110 || <html><a href="Retro_Quest"><img src="https://tibiaidle.com/item-images/7562.gif" width="32" /></a> <a href="Retro_Quest"><img src="https://tibiaidle.com/item-images/7583.gif" width="32" /></a> <a href="Retro_Quest"><img src="https://tibiaidle.com/item-images/7584.gif" width="32" /></a> <a href="Retro_Quest"><img src="https://tibiaidle.com/item-images/7585.gif" width="32" /></a></html> || [[Retro Quest]] || <html><a href="Retro_Quest"><img src="https://tibiaidle.com/images/retroquest.jpg" width="100" /></a></html> || ⭐⭐⭐ |
| | |
| |- | | |- |
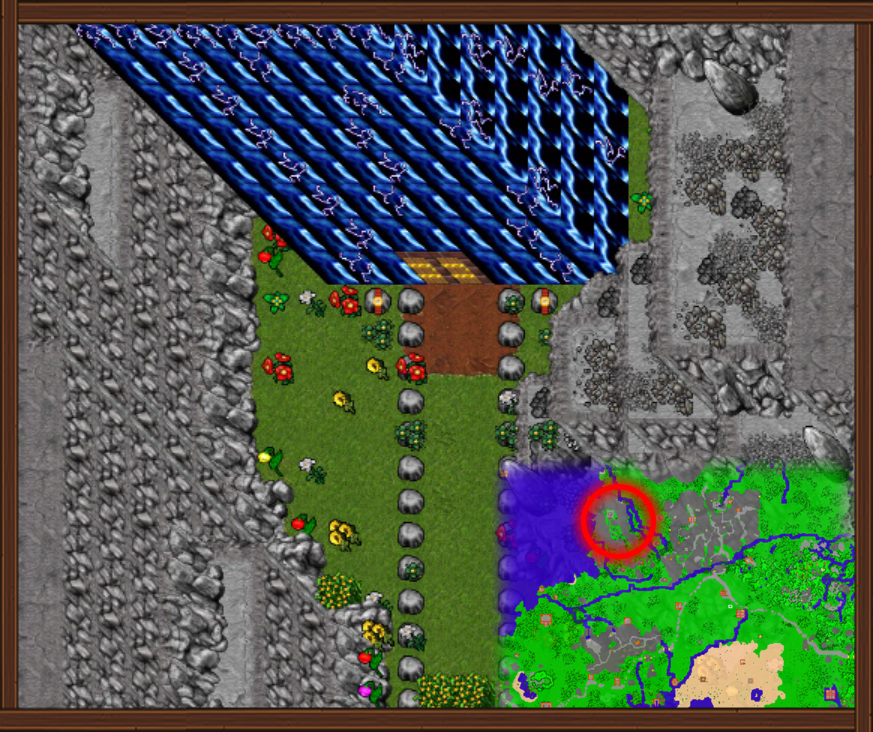
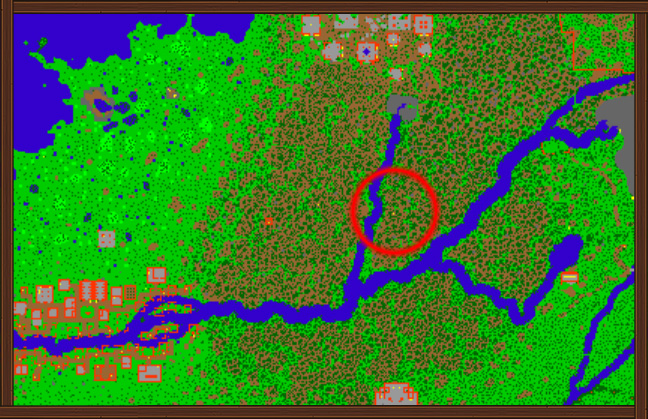
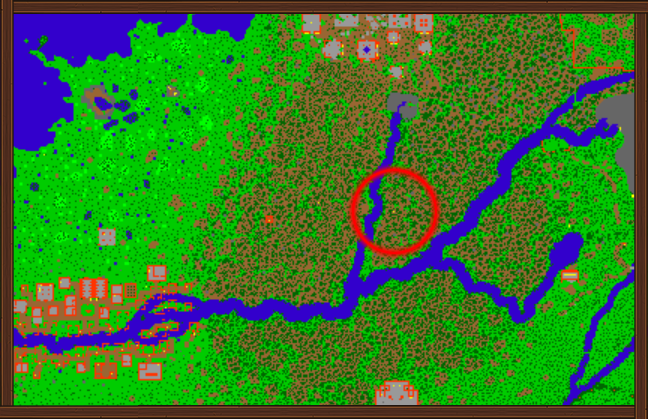
| | <html><a href="Spellbook_of_Mind_Control"><img src="https://tibiaidle.com/images/spellbokmindcontroll.jpg" width="100" /></a></html> || [[Spellbook of Mind Control]] || 115 || <html><a href="Spellbook_of_Mind_Control"><img src="https://tibiaidle.com/item-images/7498.gif" width="32" /></a></html> || You start the quest in Edron on level -1. The tactic for magicians is to use the utamo vita spell and run as fast as possible and hide behind the walls that appear after moving the lever. | | | 115 || <html><a href="Spellbook_of_Mind_Control_Quest"><img src="https://tibiaidle.com/item-images/7498.gif" width="32" /></a></html> || [[Spellbook of Mind Control Quest]] || <html><a href="Spellbook_of_Mind_Control_Quest"><img src="https://tibiaidle.com/images/spellbokmindcontroll.jpg" width="100" /></a></html> || ⭐⭐⭐⭐⭐ |
| | |
| |- | | |- |
| | <html><a href="Brotherhood_Outfit"><img src="https://tibiaidle.com/images/brotherhood.jpg" width="100" /></a></html> || [[Brotherhood Outfit]] || 115 || <html><a href="Brotherhood_Outfit"><img src="https://tibiaidle.com/item-images/brotherhood1.png" width="32" /></a> <a href="Brotherhood_Outfit"><img src="https://tibiaidle.com/item-images/brotherhood2.png" width="32" /></a></html> || You start the quest in Darashia at level +3. After completing the quest, you will receive the Brotherhood outfit. You have to do addons separately from NPC Gustaw. | | | 115 || <html><a href="Brotherhood_Outfit"><img src="https://tibiaidle.com/item-images/brotherhood1.png" width="32" /></a> <a href="Brotherhood_Outfit"><img src="https://tibiaidle.com/item-images/brotherhood2.png" width="32" /></a></html> || [[Brotherhood Outfit]] || <html><a href="Brotherhood_Outfit"><img src="https://tibiaidle.com/images/brotherhood.jpg" width="100" /></a></html> || ⭐⭐⭐⭐ |
| | |
| |- | | |- |
| | <html><a href="Azerus_Quest"><img src="https://tibiaidle.com/images/azerus.jpg" width="100" /></a></html> || [[Azerus Quest]] || 120 || <html><a href="Azerus_Quest"><img src="https://tibiaidle.com/item-images/7501.gif" width="32" /></a> <a href="Azerus_Quest"><img src="https://tibiaidle.com/item-images/7502.gif" width="32" /></a> <a href="Azerus_Quest"><img src="https://tibiaidle.com/item-images/7503.gif" width="32" /></a></html> || Visit Cormaya and start the quest. To enter the room with Azerus, you must find the tree of life. After killing Azerus, you will receive not only a reward but also access to new hunting grounds where you can go by small boat. | | | 120 || <html><a href="Azerus_Quest"><img src="https://tibiaidle.com/item-images/7501.gif" width="32" /></a> <a href="Azerus_Quest"><img src="https://tibiaidle.com/item-images/7502.gif" width="32" /></a> <a href="Azerus_Quest"><img src="https://tibiaidle.com/item-images/7503.gif" width="32" /></a></html> || [[Azerus Quest]] || <html><a href="Azerus_Quest"><img src="https://tibiaidle.com/images/azerus.jpg" width="100" /></a></html> || ⭐⭐⭐⭐ |
| | |
| |- | | |- |
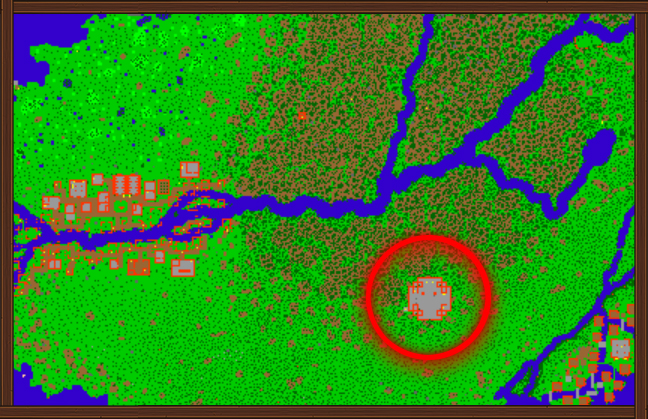
| | <html><a href="Demon_Legs"><img src="https://tibiaidle.com/images/deomnLegs.jpg" width="100" /></a></html> || [[Demon Legs]] || 120 || <html><a href="Demon_Legs"><img src="https://item-images.ots.me/800//2495.gif" width="32" /></a></html> || You start the quest in the very south of the Plains of Havoc. You have to open all the coffins. Each time you open the coffin, a horde of undead creatures appears. Once you've opened them all, you can use the statue in the middle. PACC Required. | | | 120 || <html><a href="Demon_Legs_Quest"><img src="https://item-images.ots.me/800//2495.gif" width="32" /></a></html> || [[Demon Legs Quest]] || <html><a href="Demon_Legs_Quest"><img src="https://tibiaidle.com/images/deomnLegs.jpg" width="100" /></a></html> || ⭐⭐⭐⭐ |
| | |
| |- | | |- |
| | <html><a href="Nightmare_Outfit"><img src="https://tibiaidle.com/images/nightmareOutfit.jpg" width="100" /></a></html> || [[Nightmare Outfit]] || 125 || <html><a href="Nightmare_Outfit"><img src="https://tibiaidle.com/item-images/nightmare1.png" width="32" /></a> <a href="Nightmare_Outfit"><img src="https://tibiaidle.com/item-images/nightmare2.png" width="32" /></a></html> || You start the quest where the orc fortress quest ends. All required items except the helmet can be found as loot from the Nightmare Knights' camp. You can make addons from NPC Gustaw. | | | 125 || <html><a href="Nightmare_Outfit"><img src="https://tibiaidle.com/item-images/nightmare1.png" width="32" /></a> <a href="Nightmare_Outfit"><img src="https://tibiaidle.com/item-images/nightmare2.png" width="32" /></a></html> || [[Nightmare Outfit]] || <html><a href="Nightmare_Outfit"><img src="https://tibiaidle.com/images/nightmareOutfit.jpg" width="100" /></a></html> || ⭐⭐⭐ |
| | |
| |- | | |- |
| | <html><a href="12h_Idle_Exp"><img src="https://tibiaidle.com/images/12hquest.jpg" width="100" /></a></html> || [[12h Idle Exp]] || 130 || <html><a href="12h_Idle_Exp"><img src="https://tibiaidle.com/item-images/1728.png" width="32" /></a></html> || The quest starts in Darshia at the marked point on level -1. After completing this quest, you will be able to hunt for 12 hours in idle mode. The entrance fee to the hunting room will be twice as high. The quest will be active for 90 days, after that time you can complete it again. | | | 130 || <html><a href="12h_Idle_Exp"><img src="https://tibiaidle.com/item-images/1728.png" width="32" /></a></html> || [[12h Idle Exp]] || <html><a href="12h_Idle_Exp"><img src="https://tibiaidle.com/images/12hquest.jpg" width="100" /></a></html> || ⭐⭐⭐⭐ |
| | |
| |- | | |- |
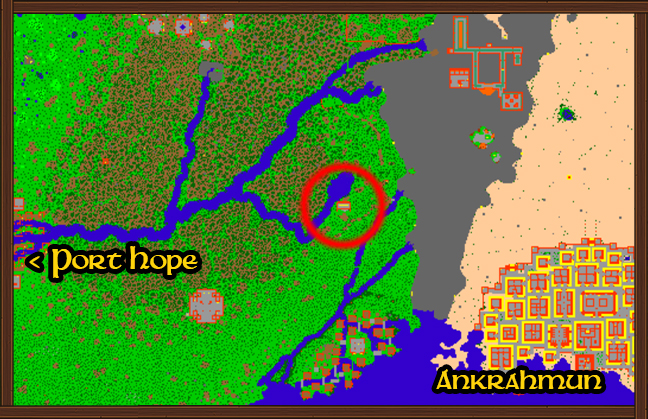
| | <html><a href="Lion_Bravery_Amulet"><img src="https://tibiaidle.com/images/lionQuest.jpg" width="100" /></a></html> || [[Lion Bravery Amulet]] || 130 || <html><a href="Lion_Bravery_Amulet"><img src="https://tibiaidle.com/item-images/7546.gif" width="32" /></a></html> || The quest can be found on level -1 of Medusa Tower in Port Hope. Get ready for a long fight with The mother of evil. | | | 130 || <html><a href="Lion_Bravery_Amulet_Quest"><img src="https://tibiaidle.com/item-images/7546.gif" width="32" /></a></html> || [[Lion Bravery Amulet Quest]] || <html><a href="Lion_Bravery_Amulet_Quest"><img src="https://tibiaidle.com/images/lionQuest.jpg" width="100" /></a></html> || ⭐⭐⭐⭐ |
| | |
| |- | | |- |
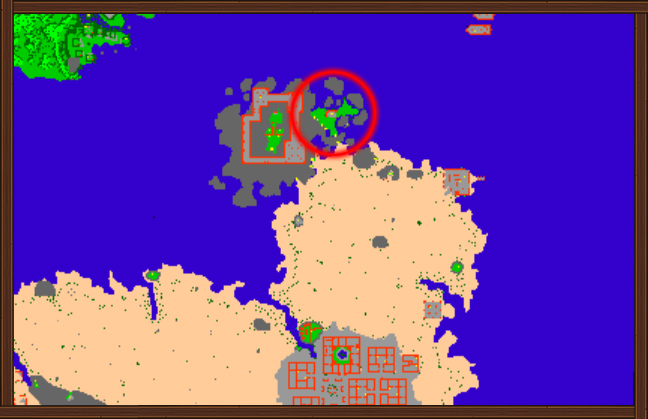
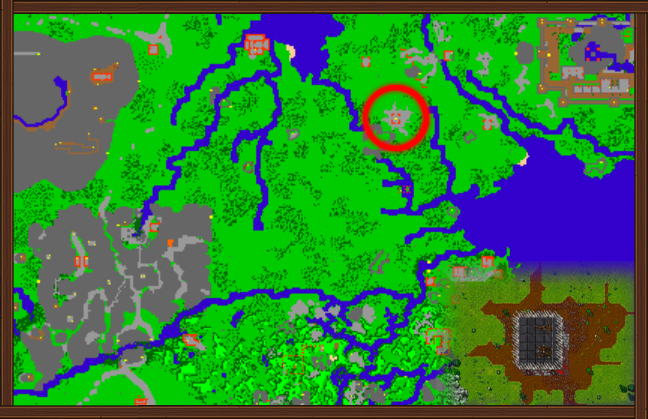
| | <html><a href="Retro_Hunter_Outfit"><img src="https://tibiaidle.com/images/retrohunter.jpg" width="100" /></a></html> || [[Retro Hunter Outfit]] || 130 || <html><a href="Retro_Hunter_Outfit"><img src="https://tibiaidle.com/item-images/retrohunter1.png" width="32" /></a> <a href="Retro_Hunter_Outfit"><img src="https://tibiaidle.com/item-images/retrohunter2.png" width="32" /></a></html> || You start the quest on the marked Laguna Island. On level -2, you will encounter an NPC who will guide you on what to do next. | | | 130 || <html><a href="Retro_Hunter_Outfit"><img src="https://tibiaidle.com/item-images/retrohunter1.png" width="32" /></a> <a href="Retro_Hunter_Outfit"><img src="https://tibiaidle.com/item-images/retrohunter2.png" width="32" /></a></html> || [[Retro Hunter Outfit]] || <html><a href="Retro_Hunter_Outfit"><img src="https://tibiaidle.com/images/retrohunter.jpg" width="100" /></a></html> || ⭐⭐⭐ |
| | |
| |- | | |- |
| | <html><a href="Pits_of_Abyss"><img src="https://tibiaidle.com/images/nightmareOutfit.jpg" width="100" /></a></html> || [[Pits of Abyss]] || 130 || <html><a href="Pits_of_Abyss"><img src="https://tibiaidle.com/item-images/7538.gif" width="32" /></a> <a href="Pits_of_Abyss"><img src="https://tibiaidle.com/item-images/7511.gif" width="32" /></a></html> || For the bravest adventurers, we present the Ultimate Challenge. This quest is extremely difficult and requires a well-coordinated team. If you've conquered POI trials, know that this task is far more challenging. We provide no hints; start where you crafted your Nightmare Outfit and confront the ultimate ordeal. In addition to the standard rewards, you have a chance to obtain the Golden Helmet, with 7 attempts available, each every 24 hours, and a 1% chance of success. | | | 130 || <html><a href="Pits_of_Abyss"><img src="https://tibiaidle.com/item-images/7538.gif" width="32" /></a> <a href="Pits_of_Abyss"><img src="https://tibiaidle.com/item-images/7511.gif" width="32" /></a></html> || [[Pits of Abyss]] || <html><a href="Pits_of_Abyss"><img src="https://tibiaidle.com/images/nightmareOutfit.jpg" width="100" /></a></html> || ⭐⭐⭐⭐⭐⭐ |
| | |
| |- | | |- |
| | <html><a href="Retro_Warrior_Outfit"><img src="https://tibiaidle.com/images/retrowarrior.jpg" width="100" /></a></html> || [[Retro Warrior Outfit]] || 135 || <html><a href="Retro_Warrior_Outfit"><img src="https://tibiaidle.com/item-images/retrowarriormale.png" width="32" /></a> <a href="Retro_Warrior_Outfit"><img src="https://tibiaidle.com/item-images/retrowarriorfemale.png" width="32" /></a></html> || You begin the quest at level -3 in the Elf Fortress near Venore. There, you will meet Sir Valorian, who will instruct you on how to obtain the retro warrior outfit. | | | 135 || <html><a href="Retro_Warrior_Outfit"><img src="https://tibiaidle.com/item-images/retrowarriormale.png" width="32" /></a> <a href="Retro_Warrior_Outfit"><img src="https://tibiaidle.com/item-images/retrowarriorfemale.png" width="32" /></a></html> || [[Retro Warrior Outfit]] || <html><a href="Retro_Warrior_Outfit"><img src="https://tibiaidle.com/images/retrowarrior.jpg" width="100" /></a></html> || ⭐⭐⭐⭐ |
| | |
| |- | | |- |
| | <html><a href="Mystery_Quest"><img src="https://tibiaidle.com/images/mysteryQuest.jpg" width="100" /></a></html> || [[Mystery Quest]] || 140 || <html><a href="Mystery_Quest"><img src="https://item-images.ots.me/860//8889.gif" width="32" /></a> <a href="Mystery_Quest"><img src="https://item-images.ots.me/860//8888.gif" width="32" /></a> <a href="Mystery_Quest"><img src="https://item-images.ots.me/860//8890.gif" width="32" /></a></html> || You start the quest near the orc fortress. You need to clear 3 rooms full of enemies. At the end of each room there will be a boss who is a legendary Tibia player. You must kill all 3 bosses then you will gain access to the reward room. PACC Required. | | | 140 || <html><a href="Mystery_Quest"><img src="https://item-images.ots.me/860//8889.gif" width="32" /></a> <a href="Mystery_Quest"><img src="https://item-images.ots.me/860//8888.gif" width="32" /></a> <a href="Mystery_Quest"><img src="https://item-images.ots.me/860//8890.gif" width="32" /></a></html> || [[Mystery Quest]] || <html><a href="Mystery_Quest"><img src="https://tibiaidle.com/images/mysteryQuest.jpg" width="100" /></a></html> || ⭐⭐⭐⭐⭐ |
| | |
| |- | | |- |
| | <html><a href="Demon_Outfit"><img src="https://tibiaidle.com/images/MPAQuest.jpg" width="100" /></a></html> || [[Demon Outfit]] || 145 || <html><a href="Demon_Outfit"><img src="https://tibiaidle.com/item-images/demon1.png" width="32" /></a> <a href="Demon_Outfit"><img src="https://tibiaidle.com/item-images/demon2.png" width="32" /></a></html> || You start the quest in the same place as the Magic Plate Armor quest, but this time, head towards the level gate. There, you'll meet an Demonic Breeder who has two missions for you. | | | 145 || <html><a href="Demon_Outfit"><img src="https://tibiaidle.com/item-images/demon1.png" width="32" /></a> <a href="Demon_Outfit"><img src="https://tibiaidle.com/item-images/demon2.png" width="32" /></a></html> || [[Demon Outfit Quest]] || <html><a href="Demon_Outfit"><img src="https://tibiaidle.com/images/MPAQuest.jpg" width="100" /></a></html> || ⭐⭐⭐⭐⭐ |
| | |
| |- | | |- |
| | <html><a href="Nightmare_Shield"><img src="https://tibiaidle.com/images/150lvlquest.jpg" width="100" /></a></html> || [[Nightmare Shield]] || 150 || <html><a href="Nightmare_Shield"><img src="https://item-images.ots.me/860//6391.gif" width="32" /></a> <a href="Nightmare_Shield"><img src="https://item-images.ots.me/860//6433.gif" width="32" /></a> <a href="Nightmare_Shield"><img src="https://tibiaidle.com/item-images/7497.gif" width="32" /></a></html> || You start the quest after Vampire Shield Quest. You will encounter several puzzles along the way. As a reward, you can randomly choose Nightmare Shield, Necromacer Shield or Spellbook of the Dark Mysteries. | | | 150 || <html><a href="Nightmare_Shield"><img src="https://item-images.ots.me/860//6391.gif" width="32" /></a> <a href="Nightmare_Shield"><img src="https://item-images.ots.me/860//6433.gif" width="32" /></a> <a href="Nightmare_Shield"><img src="https://tibiaidle.com/item-images/7497.gif" width="32" /></a></html> || [[Nightmare Shield Quest]] || <html><a href="Nightmare_Shield"><img src="https://tibiaidle.com/images/150lvlquest.jpg" width="100" /></a></html> || ⭐⭐⭐⭐ |
| | |
| |- | | |- |
| | <html><a href="Retro_Knight_Outfit"><img src="https://tibiaidle.com/images/retroknight.jpg" width="100" /></a></html> || [[Retro Knight Outfit]] || 155 || <html><a href="Retro_Knight_Outfit"><img src="https://tibiaidle.com/item-images/retroknight1.png" width="32" /></a> <a href="Retro_Knight_Outfit"><img src="https://tibiaidle.com/item-images/retroknight2.png" width="32" /></a></html> || It turns out that the final chamber of the Black Knight quest holds yet another riddle. You can make addons from NPC Gustaw. | | | 155 || <html><a href="Retro_Knight_Outfit"><img src="https://tibiaidle.com/item-images/retroknight1.png" width="32" /></a> <a href="Retro_Knight_Outfit"><img src="https://tibiaidle.com/item-images/retroknight2.png" width="32" /></a></html> || [[Retro Knight Outfit]] || <html><a href="Retro_Knight_Outfit"><img src="https://tibiaidle.com/images/retroknight.jpg" width="100" /></a></html> || ⭐⭐⭐ |
| | |
| |- | | |- |
| | <html><a href="Hellgorak_Quest"><img src="https://tibiaidle.com/images/160lvlquest.jpg" width="100" /></a></html> || [[Hellgorak Quest]] || 160 || <html><a href="Hellgorak_Quest"><img src="https://tibiaidle.com/item-images/7520.gif" width="32" /></a> <a href="Hellgorak_Quest"><img src="https://tibiaidle.com/item-images/7518.gif" width="32" /></a> <a href="Hellgorak_Quest"><img src="https://tibiaidle.com/item-images/7519.gif" width="32" /></a> <a href="Hellgorak_Quest"><img src="https://tibiaidle.com/item-images/7558.gif" width="32" /></a> <a href="Hellgorak_Quest"><img src="https://tibiaidle.com/item-images/7596.gif" width="32" /></a></html> || You start the quest in the basement of Mount Sternum, level -2. You have to go through several rooms and at the end you will encounter a strong boss. PACC required. | | | 160 || <html><a href="Hellgorak_Quest"><img src="https://tibiaidle.com/item-images/7520.gif" width="32" /></a> <a href="Hellgorak_Quest"><img src="https://tibiaidle.com/item-images/7518.gif" width="32" /></a> <a href="Hellgorak_Quest"><img src="https://tibiaidle.com/item-images/7519.gif" width="32" /></a> <a href="Hellgorak_Quest"><img src="https://tibiaidle.com/item-images/7558.gif" width="32" /></a> <a href="Hellgorak_Quest"><img src="https://tibiaidle.com/item-images/7596.gif" width="32" /></a></html> || [[Hellgorak Quest]] || <html><a href="Hellgorak_Quest"><img src="https://tibiaidle.com/images/160lvlquest.jpg" width="100" /></a></html> || ⭐⭐⭐⭐ |
| | |
| |- | | |- |
| | <html><a href="Demon_Hunter_Outfit"><img src="https://tibiaidle.com/images/demonhunter.jpg" width="100" /></a></html> || [[Demon Hunter Outfit]] || 170 || <html><a href="Demon_Hunter_Outfit"><img src="https://tibiaidle.com/item-images/demonhunter1.png" width="32" /></a> <a href="Demon_Hunter_Outfit"><img src="https://tibiaidle.com/item-images/demonhunter2.png" width="32" /></a></html> || You start the quest in the basement of Ferumbras Tower. You will encounter hordes of monsters to defeat. You can make addons from NPC Gustaw. | | | 170 || <html><a href="Demon_Hunter_Outfit"><img src="https://tibiaidle.com/item-images/demonhunter1.png" width="32" /></a> <a href="Demon_Hunter_Outfit"><img src="https://tibiaidle.com/item-images/demonhunter2.png" width="32" /></a></html> || [[Demon Hunter Outfit Quest]] || <html><a href="Demon_Hunter_Outfit"><img src="https://tibiaidle.com/images/demonhunter.jpg" width="100" /></a></html> || ⭐⭐⭐⭐ |
| | |
| |- | | |- |
| | <html><a href="Full_Helmet_of_the_Ancients"><img src="https://tibiaidle.com/images/hota2map.png" width="100" /></a></html> || [[Full Helmet of the Ancients]] || 180 || <html><a href="Full_Helmet_of_the_Ancients"><img src="https://item-images.ots.me/860//2343.gif" width="32" /></a></html> || Turn your regular Helmet of the Ancients into a stronger version that never ends. Reach the pyramid hidden underground, where you fight three pharaohs. After reaching the room with three magic stones, you must activate all of them and defeat the pharaohs, then you will be allowed into the place where you can sacrifice your Helmet of the Ancient. | | | 180 || <html><a href="Full_Helmet_of_the_Ancients"><img src="https://item-images.ots.me/860//2343.gif" width="32" /></a></html> || [[Full Helmet of the Ancients Quest]] || <html><a href="Full_Helmet_of_the_Ancients"><img src="https://tibiaidle.com/images/hota2map.png" width="100" /></a></html> || ⭐⭐⭐⭐ |
| | |
| |- | | |- |
| | <html><a href="+2%_idle_exp_boost"><img src="https://tibiaidle.com/images/questhidden.png" width="100" /></a></html> || [[+2% idle exp boost]] || 180 || <html><a href="+2%_idle_exp_boost"><img src="https://tibiaidle.com/item-images/expboost.png" width="32" /></a></html> || Available at the end of June. | | | 180 || <html><a href="+2%_idle_exp_boost"><img src="https://tibiaidle.com/item-images/expboost.png" width="32" /></a></html> || [[+2% idle exp boost]] || <html><a href="+2%_idle_exp_boost"><img src="https://tibiaidle.com/images/2idlequest.jpg" width="100" /></a></html> || ⭐⭐⭐⭐ |
| | |
| |- | | |- |
| | <html><a href="Rogue_Outfit"><img src="https://tibiaidle.com/images/rogueoutfitquest.jpg" width="100" /></a></html> || [[Rogue Outfit]] || 190 || <html><a href="Rogue_Outfit"><img src="https://tibiaidle.com/item-images/rogue2.png" width="32" /></a> <a href="Rogue_Outfit"><img src="https://tibiaidle.com/item-images/rogue1.png" width="32" /></a></html> || You start the quest in the jungle of Port Hope. In the underground on level -1, near the shortcut to Banuta. In the spider's lair, Govani is trapped—he will tell you what to do next to get the Rogue Outfit. | | | 190 || <html><a href="Rogue_Outfit"><img src="https://tibiaidle.com/item-images/rogue2.png" width="32" /></a> <a href="Rogue_Outfit"><img src="https://tibiaidle.com/item-images/rogue1.png" width="32" /></a></html> || [[Rogue Outfit Quest]] || <html><a href="Rogue_Outfit"><img src="https://tibiaidle.com/images/rogueoutfitquest.jpg" width="100" /></a></html> || ⭐⭐⭐⭐ |
| | |
| |- | | |- |
| | <html><a href="Inferno_Boots_of_Haste"><img src="https://tibiaidle.com/images/150lvlquest.jpg" width="100" /></a></html> || [[Inferno Boots of Haste]] || 200 || <html><a href="Inferno_Boots_of_Haste"><img src="https://tibiaidle.com/item-images/7591.png" width="32" /></a></html> || You start the quest where the demon helmet quest ends. For 5 days, you must bring one pair of boots of haste every day to receive inferno boots of haste on day 6. | | | 200 || <html><a href="Inferno_Boots_Of_Haste"><img src="https://tibiaidle.com/item-images/7591.png" width="32" /></a></html> || [[Inferno Boots of Haste Quest]] || <html><a href="Inferno_Boots_of_Haste_Quest"><img src="https://tibiaidle.com/images/150lvlquest.jpg" width="100" /></a></html> || ⭐⭐⭐⭐⭐ |
| | |
| |- | | |- |
| | <html><a href="POI_Resurrection"><img src="https://tibiaidle.com/images/poiquest2.jpg" width="100" /></a></html> || [[POI Resurrection]] || 220 || <html><a href="POI_Resurrection"><img src="https://tibiaidle.com/item-images/7593.png" width="32" /></a> <a href="POI_Resurrection"><img src="https://tibiaidle.com/item-images/7559.png" width="32" /></a> <a href="POI_Resurrection"><img src="https://tibiaidle.com/item-images/7729.png" width="32" /></a></html> || Killed monsters from POI were reborn as stronger versions. You start the quest where the classic POI ends. | | | 220 || <html><a href="POI_Resurrection"><img src="https://tibiaidle.com/item-images/7593.png" width="32" /></a> <a href="POI_Resurrection"><img src="https://tibiaidle.com/item-images/7559.png" width="32" /></a> <a href="POI_Resurrection"><img src="https://tibiaidle.com/item-images/7729.png" width="32" /></a></html> || [[POI Resurrection]] || <html><a href="POI_Resurrection"><img src="https://tibiaidle.com/images/poiquest2.jpg" width="100" /></a></html> || ⭐⭐⭐⭐⭐ |
| | |
| |- | | |- |
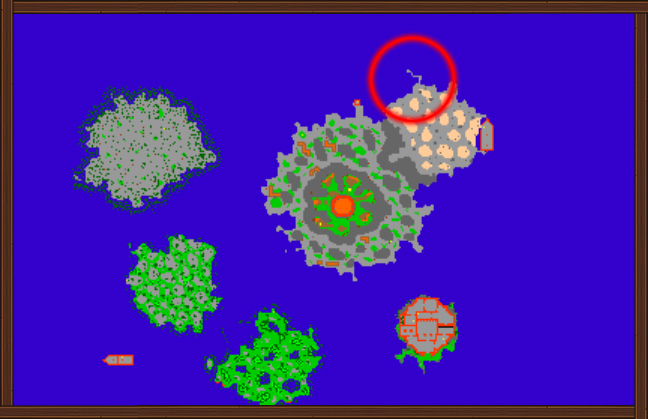
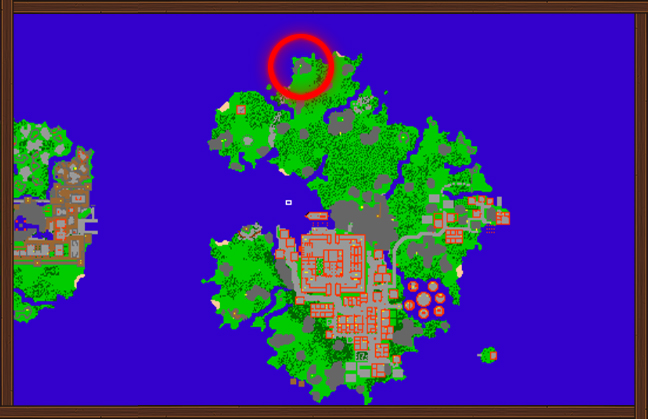
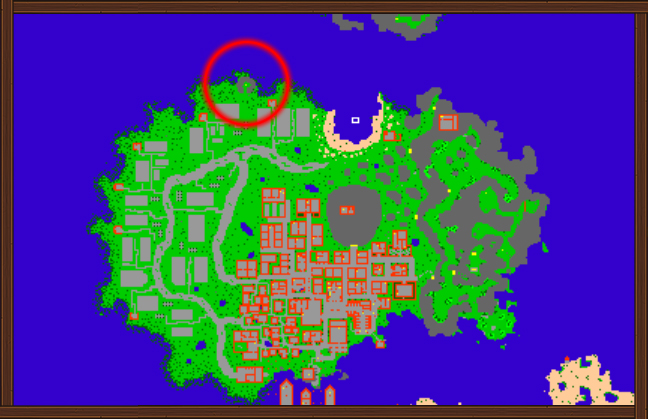
| | <html><a href="Wolvenwrath"><img src="https://tibiaidle.com/images/wolvenwrath.jpg" width="100" /></a></html> || [[Wolvenwrath]] || 240 || <html><a href="Wolvenwrath"><img src="https://tibiaidle.com/item-images/7539.png" width="32" /></a></html> || Legend has it that in a cave to the north of Liberty Bay during the full moon, the beast can be summoned. | | | 240 || <html><a href="Wolvenwrath_Quest"><img src="https://tibiaidle.com/item-images/7539.png" width="32" /></a></html> || [[Wolvenwrath Quest]] || <html><a href="Wolvenwrath"><img src="https://tibiaidle.com/images/wolvenwrath.jpg" width="100" /></a></html> || ⭐⭐⭐⭐ |
| | |
| |- | | |- |
| | <html><a href="Green_Set_Quest"><img src="https://tibiaidle.com/images/greenset.jpg" width="100" /></a></html> || [[Green Set Quest]] || 250 || <html><a href="Green_Set_Quest"><img src="https://tibiaidle.com/item-images/7937.png" width="32" /></a> <a href="Green_Set_Quest"><img src="https://tibiaidle.com/item-images/7739.png" width="32" /></a> <a href="Green_Set_Quest"><img src="https://tibiaidle.com/item-images/7586.png" width="32" /></a></html> || Find the Ogre lair on level -2 of Port Hope and solve the ancient puzzle there. | | | 250 || <html><a href="Green_Set_Quest"><img src="https://tibiaidle.com/item-images/7937.png" width="32" /></a> <a href="Green_Set_Quest"><img src="https://tibiaidle.com/item-images/7739.png" width="32" /></a> <a href="Green_Set_Quest"><img src="https://tibiaidle.com/item-images/7586.png" width="32" /></a></html> || [[Green Set Quest]] || <html><a href="Green_Set_Quest"><img src="https://tibiaidle.com/images/greenset.jpg" width="100" /></a></html> || ⭐⭐⭐⭐⭐⭐ |
| | |
| |- | | |- |
| | <html><a href="Amber_Dragon_Quest"><img src="https://tibiaidle.com/images/amberdragon.jpg" width="100" /></a></html> || [[Amber Dragon Quest]] || 260 || <html><a href="Amber_Dragon_Quest"><img src="https://tibiaidle.com/item-images/7594.png" width="32" /></a> <a href="Amber_Dragon_Quest"><img src="https://tibiaidle.com/item-images/7742.png" width="32" /></a> <a href="Amber_Dragon_Quest"><img src="https://tibiaidle.com/item-images/7811.png" width="32" /></a></html> || You start the quest in the underground of Goroma near Morgaroth's chamber. Reach the room where you will fight the dragon kings. | | | 260 || <html><a href="Amber_Dragon_Quest"><img src="https://tibiaidle.com/item-images/7594.png" width="32" /></a> <a href="Amber_Dragon_Quest"><img src="https://tibiaidle.com/item-images/7742.png" width="32" /></a> <a href="Amber_Dragon_Quest"><img src="https://tibiaidle.com/item-images/7811.png" width="32" /></a></html> || [[Amber Dragon Quest]] || <html><a href="Amber_Dragon_Quest"><img src="https://tibiaidle.com/images/amberdragon.jpg" width="100" /></a></html> || ⭐⭐⭐⭐ |
| | |
| |- | | |- |
| | <html><a href="Legend_Legs_Quest"><img src="https://tibiaidle.com/images/questhidden.png" width="100" /></a></html> || [[Legend Legs Quest]] || 270 || <html><a href="Legend_Legs_Quest"><img src="https://tibiaidle.com/item-images/8214.png" width="32" /></a> <a href="Legend_Legs_Quest"><img src="https://tibiaidle.com/item-images/8245.png" width="32" /></a> <a href="Legend_Legs_Quest"><img src="https://tibiaidle.com/item-images/8123.png" width="32" /></a></html> || Available at the end of June. | | | 270 || <html><a href="Legend_Legs_Quest"><img src="https://tibiaidle.com/item-images/8214.png" width="32" /></a> <a href="Legend_Legs_Quest"><img src="https://tibiaidle.com/item-images/8245.png" width="32" /></a> <a href="Legend_Legs_Quest"><img src="https://tibiaidle.com/item-images/8123.png" width="32" /></a></html> || [[Legend Legs Quest]] || <html><a href="Legend_Legs_Quest"><img src="https://tibiaidle.com/images/questhidden.png" width="100" /></a></html> || ⭐⭐⭐⭐⭐⭐⭐ |
| | |
| |- | | |- |
| | <html><a href="Necromancer_Trail"><img src="https://tibiaidle.com/images/necromancertrail.jpg" width="100" /></a></html> || [[Necromancer Trail]] || 280 || <html><a href="Necromancer_Trail"><img src="https://tibiaidle.com/item-images/7778.png" width="32" /></a></html> || You start the quest in the underground of Goroma. Bonemancer has prepared a series of missions for you. | | | 280 || <html><a href="Necromancer_Trail"><img src="https://tibiaidle.com/item-images/7778.png" width="32" /></a></html> || [[Necromancer Trail]] || <html><a href="Necromancer_Trail"><img src="https://tibiaidle.com/images/necromancertrail.jpg" width="100" /></a></html> || ⭐⭐⭐⭐⭐ |
| | |
| |- | | |- |
| | <html><a href="Black_Demon_Helmet_Quest"><img src="https://tibiaidle.com/images/questhidden.png" width="100" /></a></html> || [[Black Demon Helmet Quest]] || 290 || <html><a href="Black_Demon_Helmet_Quest"><img src="https://tibiaidle.com/item-images/8213.png" width="32" /></a></html> || Available at the end of August. | | | 290 || <html><a href="Black_Demon_Helmet_Quest"><img src="https://tibiaidle.com/item-images/8213.png" width="32" /></a></html> || [[Black Demon Helmet Quest]] || <html><a href="Black_Demon_Helmet_Quest"><img src="https://tibiaidle.com/images/questhidden.png" width="100" /></a></html> || ⭐⭐⭐⭐⭐⭐⭐ |
| | |
| |- | | |- |
| | <html><a href="Great_Shield"><img src="https://tibiaidle.com/images/ghastlydragonquest.jpg" width="100" /></a></html> || [[Great Shield]] || 300 || <html><a href="Great_Shield"><img src="https://tibiaidle.com/item-images/2522.png" width="32" /></a> <a href="Great_Shield"><img src="https://tibiaidle.com/item-images/7814.png" width="32" /></a></html> || You start the quest on Cormaya Island in the Ghastly Dragons' cave. Each day you can try to take one step forward. | | | 300 || <html><a href="Great_Shield_Quest"><img src="https://tibiaidle.com/item-images/2522.png" width="32" /></a> <a href="Great_Shield_Quest"><img src="https://tibiaidle.com/item-images/7814.png" width="32" /></a></html> || [[Great Shield Quest]] || <html><a href="Great_Shield_Quest"><img src="https://tibiaidle.com/images/ghastlydragonquest.jpg" width="100" /></a></html> || ⭐⭐⭐⭐ |
| | |
| |- | | |- |
| | <html><a href="Solar_Weapons"><img src="https://tibiaidle.com/images/demonhunter.jpg" width="100" /></a></html> || [[Solar Weapons]] || 320 || <html><a href="Solar_Weapons"><img src="https://tibiaidle.com/item-images/7834.png" width="32" /></a> <a href="Solar_Weapons"><img src="https://tibiaidle.com/item-images/7713.png" width="32" /></a> <a href="Solar_Weapons"><img src="https://tibiaidle.com/item-images/7830.png" width="32" /></a> <a href="Solar_Weapons"><img src="https://tibiaidle.com/item-images/7522.png" width="32" /></a> <a href="Solar_Weapons"><img src="https://tibiaidle.com/item-images/7542.png" width="32" /></a></html> || You start the quest where the demon hunter outfit ends. You have to reach a dungeon full of monsters where the final task will be to find 5 statues among many fake ones. | | | 320 || <html><a href="Solar_Weapons"><img src="https://tibiaidle.com/item-images/7834.png" width="32" /></a> <a href="Solar_Weapons"><img src="https://tibiaidle.com/item-images/7713.png" width="32" /></a> <a href="Solar_Weapons"><img src="https://tibiaidle.com/item-images/7830.png" width="32" /></a> <a href="Solar_Weapons"><img src="https://tibiaidle.com/item-images/7522.png" width="32" /></a> <a href="Solar_Weapons"><img src="https://tibiaidle.com/item-images/7542.png" width="32" /></a></html> || [[Solar Weapons]] || <html><a href="Solar_Weapons"><img src="https://tibiaidle.com/images/demonhunter.jpg" width="100" /></a></html> || ⭐⭐⭐⭐⭐⭐⭐ |
| |} | | |} |